Switch Implementation Guide
Atomic offers solutions that enable users to view and modify their payroll information. The authentication process for users' payroll accounts must be conducted through our Transact interface. The specifics of your Transact integration may vary based on your particular use case and technology stack.
When users are authenticating into these systems, Atomic requires that the process be facilitated through one of our native Transact SDKs. Your integration with Transact will differ slightly depending on your specific use-case and tech stack.
Overview
Within an implementation with Atomic, data flows through the system as follows:
1
Request an access token from your server, once the user indicates they would like to proceed.
2
On your server, request an access token from Atomic's API.
3
Using your generated access token, instantiate the Atomic Transact SDK.
4
The user authenticates into their account(s) via Transact. Your UI handles clientside events as they are emitted from the SDK.
5
Optionally, receive webhook events to your server or pull Task data from the Atomic API.
Accordingly, you will need to build a few components to facilitate this process. You will need:
- UI components to display any CTAs to your users
- Client-side event handlers to handle the Transact SDK events
- Server-side components to request access tokens from Atomic's API
- Optional but recommended, a webhook receiver to listen for Atomic's webhook events

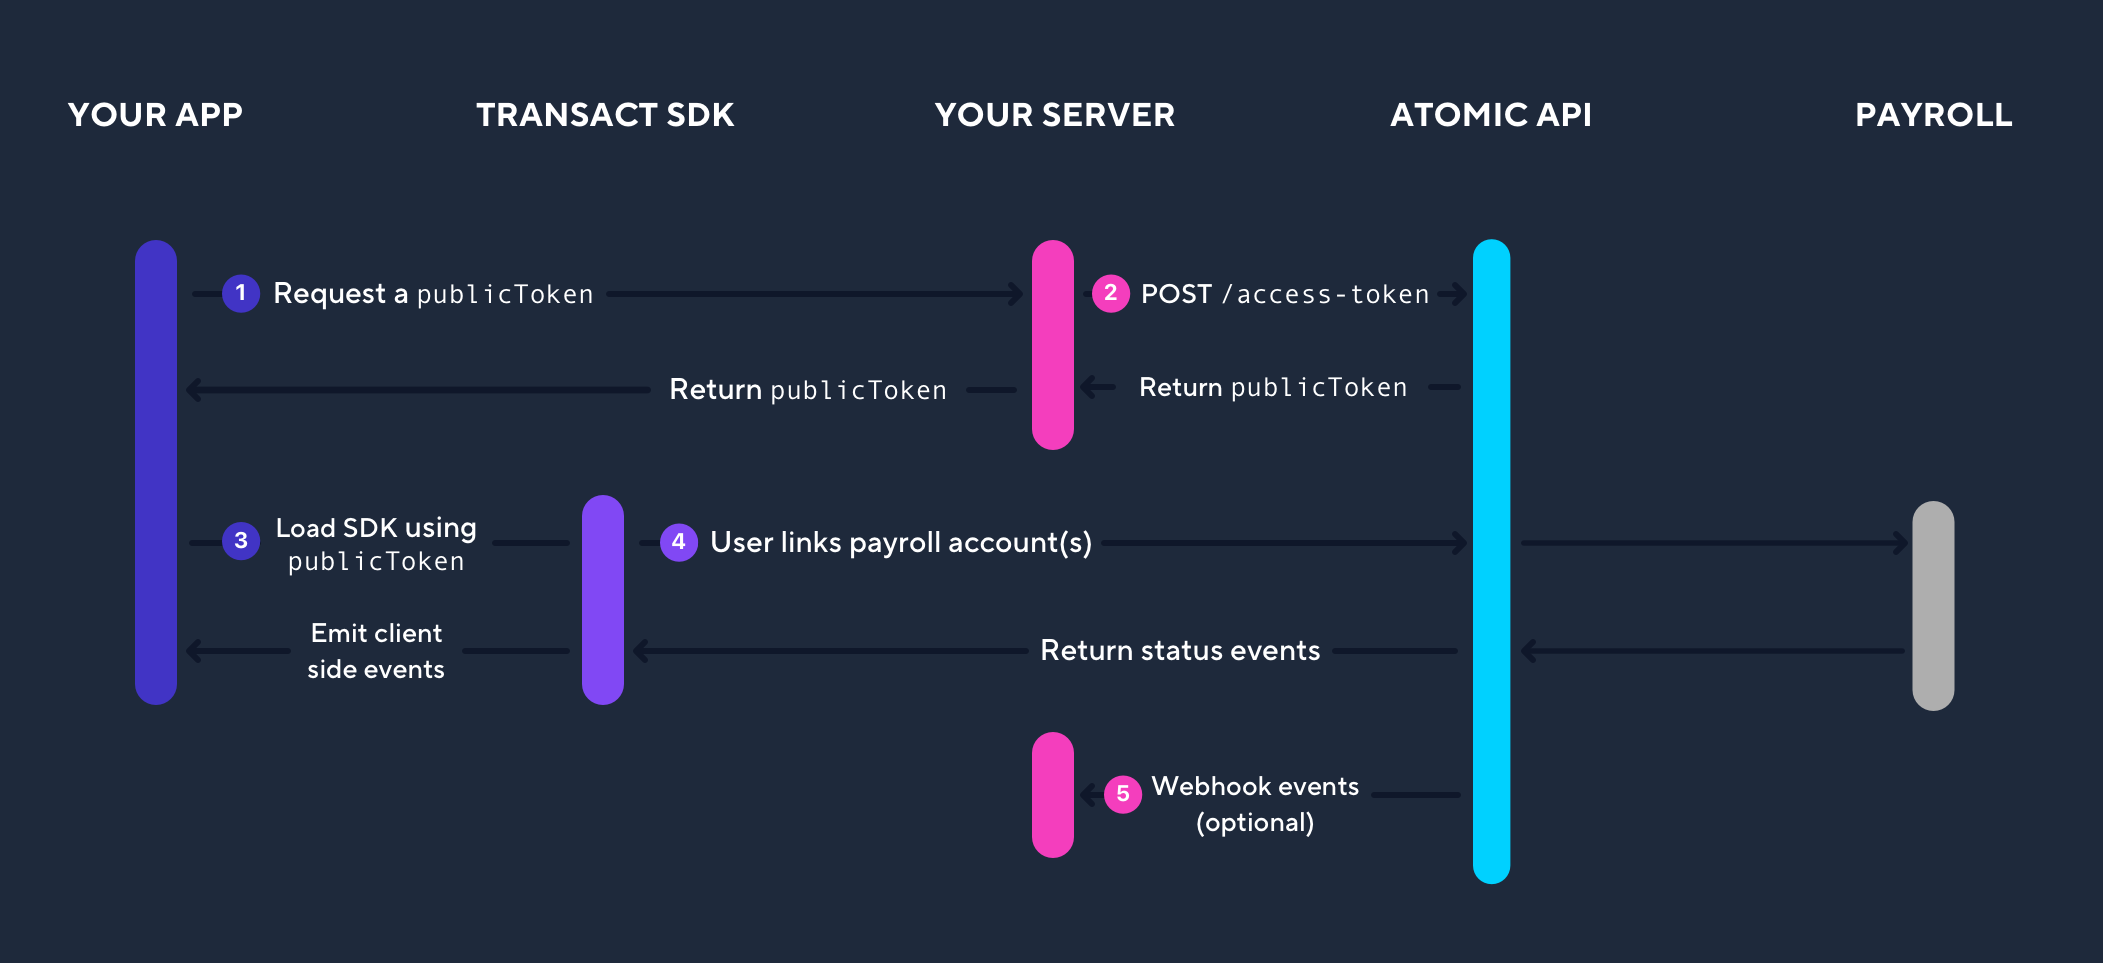
Creating an AccessToken
To initialize Transact you will need to create an AccessToken via a call to the Atomic API. These API calls are secured via your API Key and Secrets. You can retrieve your API credentials for the relevant environment from the Atomic Console.
Request an AccessToken server-side
An AccessToken for the end user is required to initialize Transact. To retrieve the AccessToken, make the following HTTPS request from your server.
This API call creates a user in the Atomic system using the identifier. All subsequent communications from Atomic, such as webhooks and client-side events, will contain this identifier to facilitate mapping corresponding data to the correct user.
AccessToken for PayLink Switch. Refer to the AccessToken API reference page for additional details. POST/access-tokenSend publicToken to your client
The above request will result in a response with a publicToken.
You will need the publicToken from the response for setting up your client-side code to initialize Transact. Once it's been received on your server, send the publicToken to your client.
{
  "data": {
    "publicToken": "PUBLIC_TOKEN"
  }
}
Transmitting card data
Automating the transfer of card data is crucial to streamline the payment switching experience. Depending on your PCI compliance status and whether or not you hold card data, your integration approach may vary.
Accordingly, there are three options for passing card data:
Option 1: During access token creationPCI Required
Just before a user initiates the Transact experience, an Access Token is created. Card data may be transferred during access token creation by passing an array of card data to Atomic’s PCI compliant environment, located at: pci.atomicfi.com. This data is temporarily held in our vault while the user completes their switching experience.
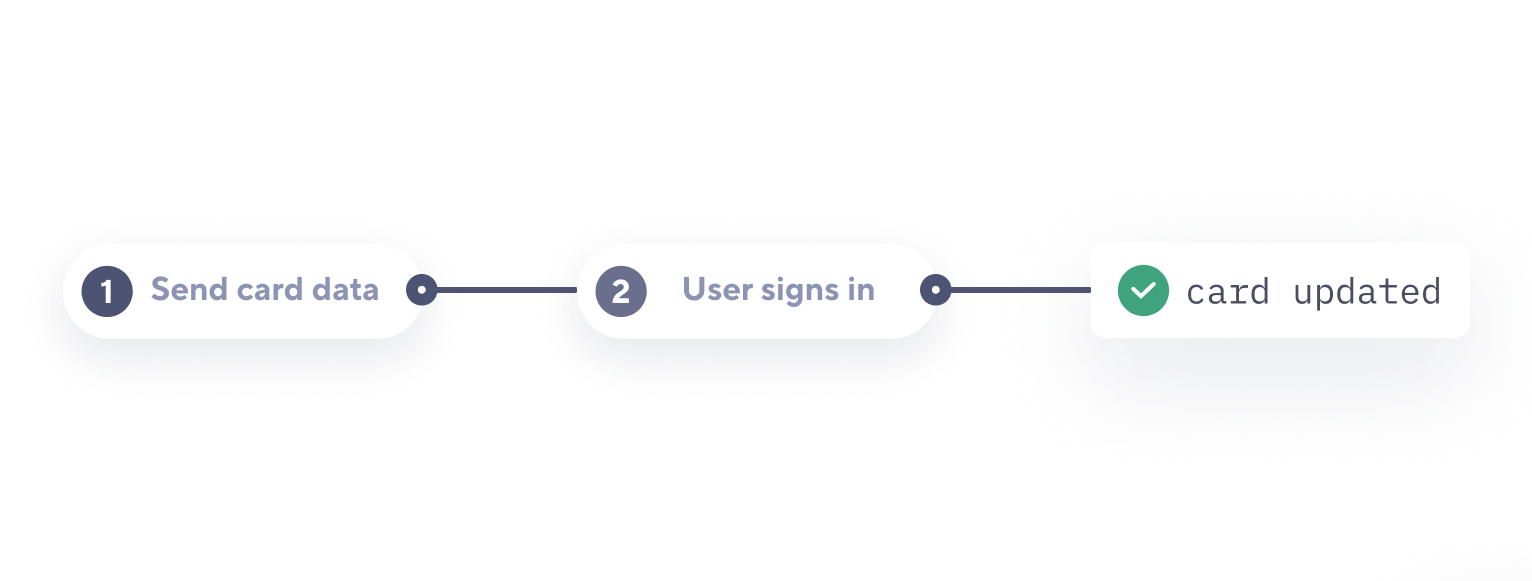
POST/access-tokenOption 2: After merchant authentication
An alternative option to up-front transfer of card data is to wait until the user authenticates with a merchant. This approach limits the amount of card data transferred to Atomic’s environment.
- Client-side: Transact will invoke a client-side
onDataRequestcallback to your system.
Once this event is received, you'll make a PUT request to our Update User endpoint to transfer the card data to be used for the switch.
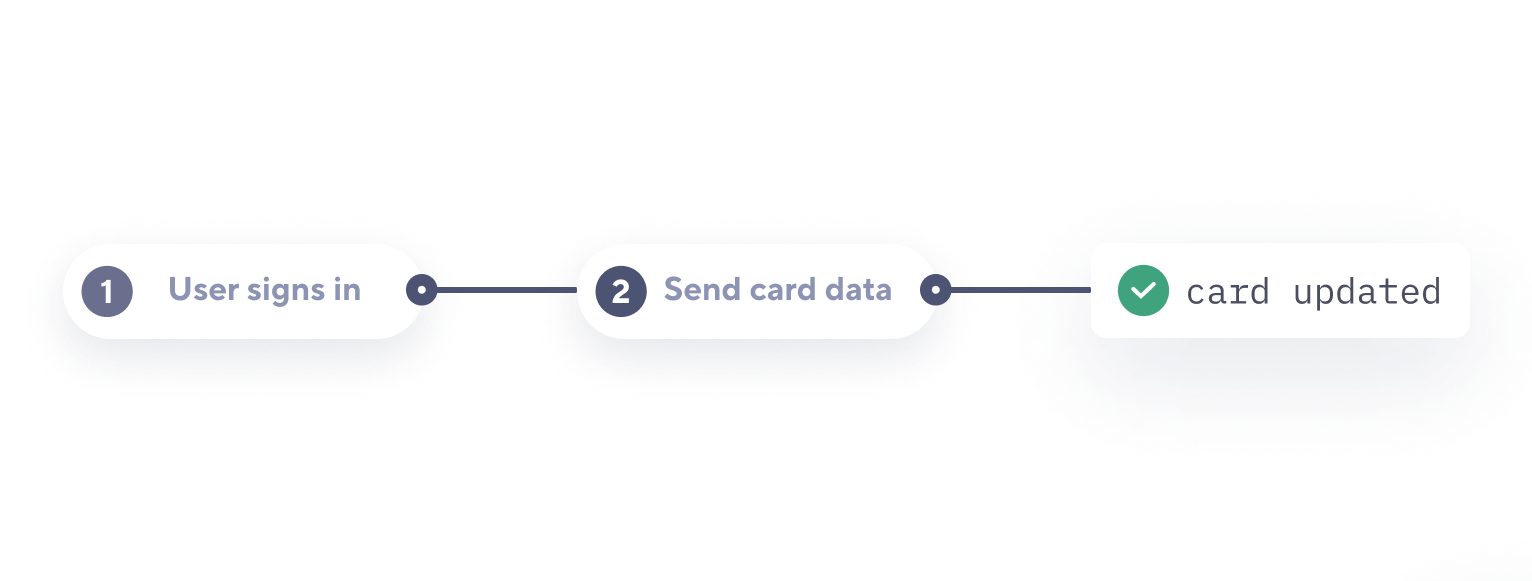
lastFour in lieu of the full card number, and omit the cvv. Please use
accountNumberLastFour in place of accountNumber when passing bank account data during access token creation. Example access token creation using insensitive fields
POST/access-tokenExample adding card data to the user after authentication
PUT/userOption 3. BaaS integration
It is common for our customers to be using a BaaS vendor for their card program, outsourcing card data management and PCI compliance to the BaaS vendor. If this describes your situation, Atomic offers a solution for transferring card data that allows your system to remain out-of-scope as it relates to PCI.
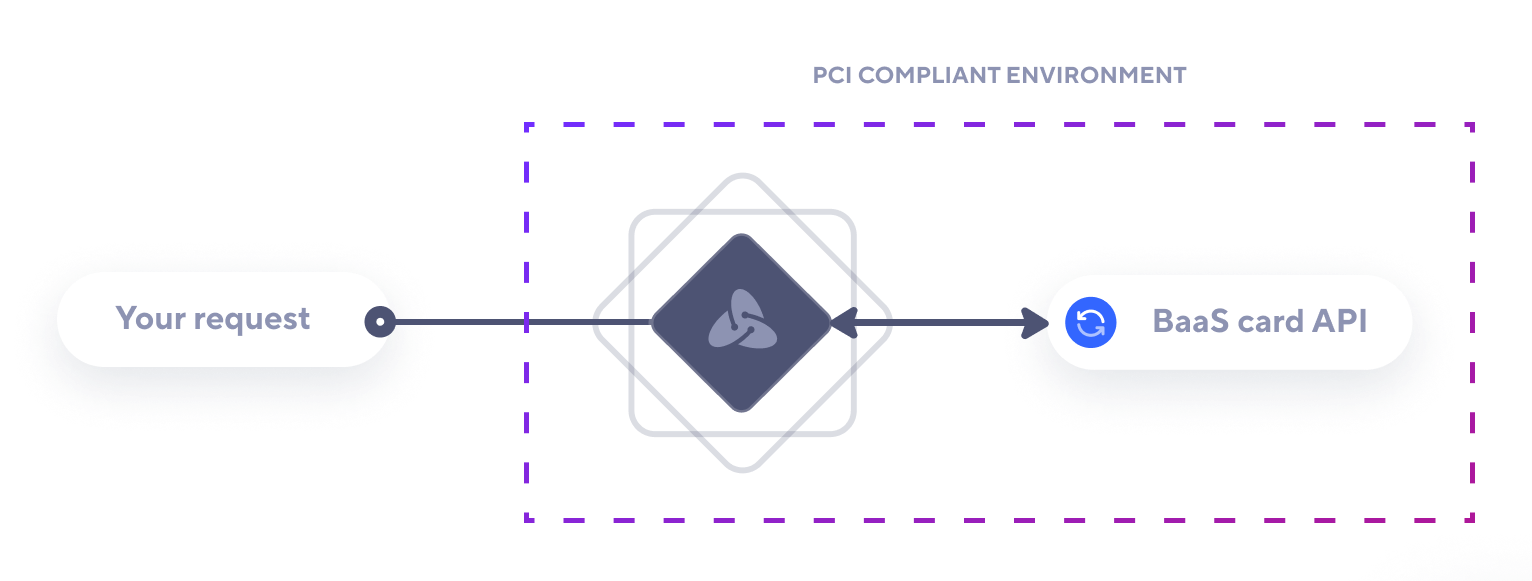
By sending a request for card details through our pci.atomicfi.com domain which contains a provider configuration, the response from the provider that may contain sensitive card fields can be routed directly to Atomic’s PCI-compliant environment.
You will add a paymentService object to your code that contains fields necessary for Atomic to retrieve the card information. The fields required vary per BaaS provider, and our team will work with you to build and test the specific integration.
Example request that implements paymentService
POST/access-tokenOption 4. CDE Bypass
If you have access to the full card data inside your app, you can use the Transact SDK to pass the card data directly to our SDK, allowing the card data to stay on the device until being passed to the merchant.
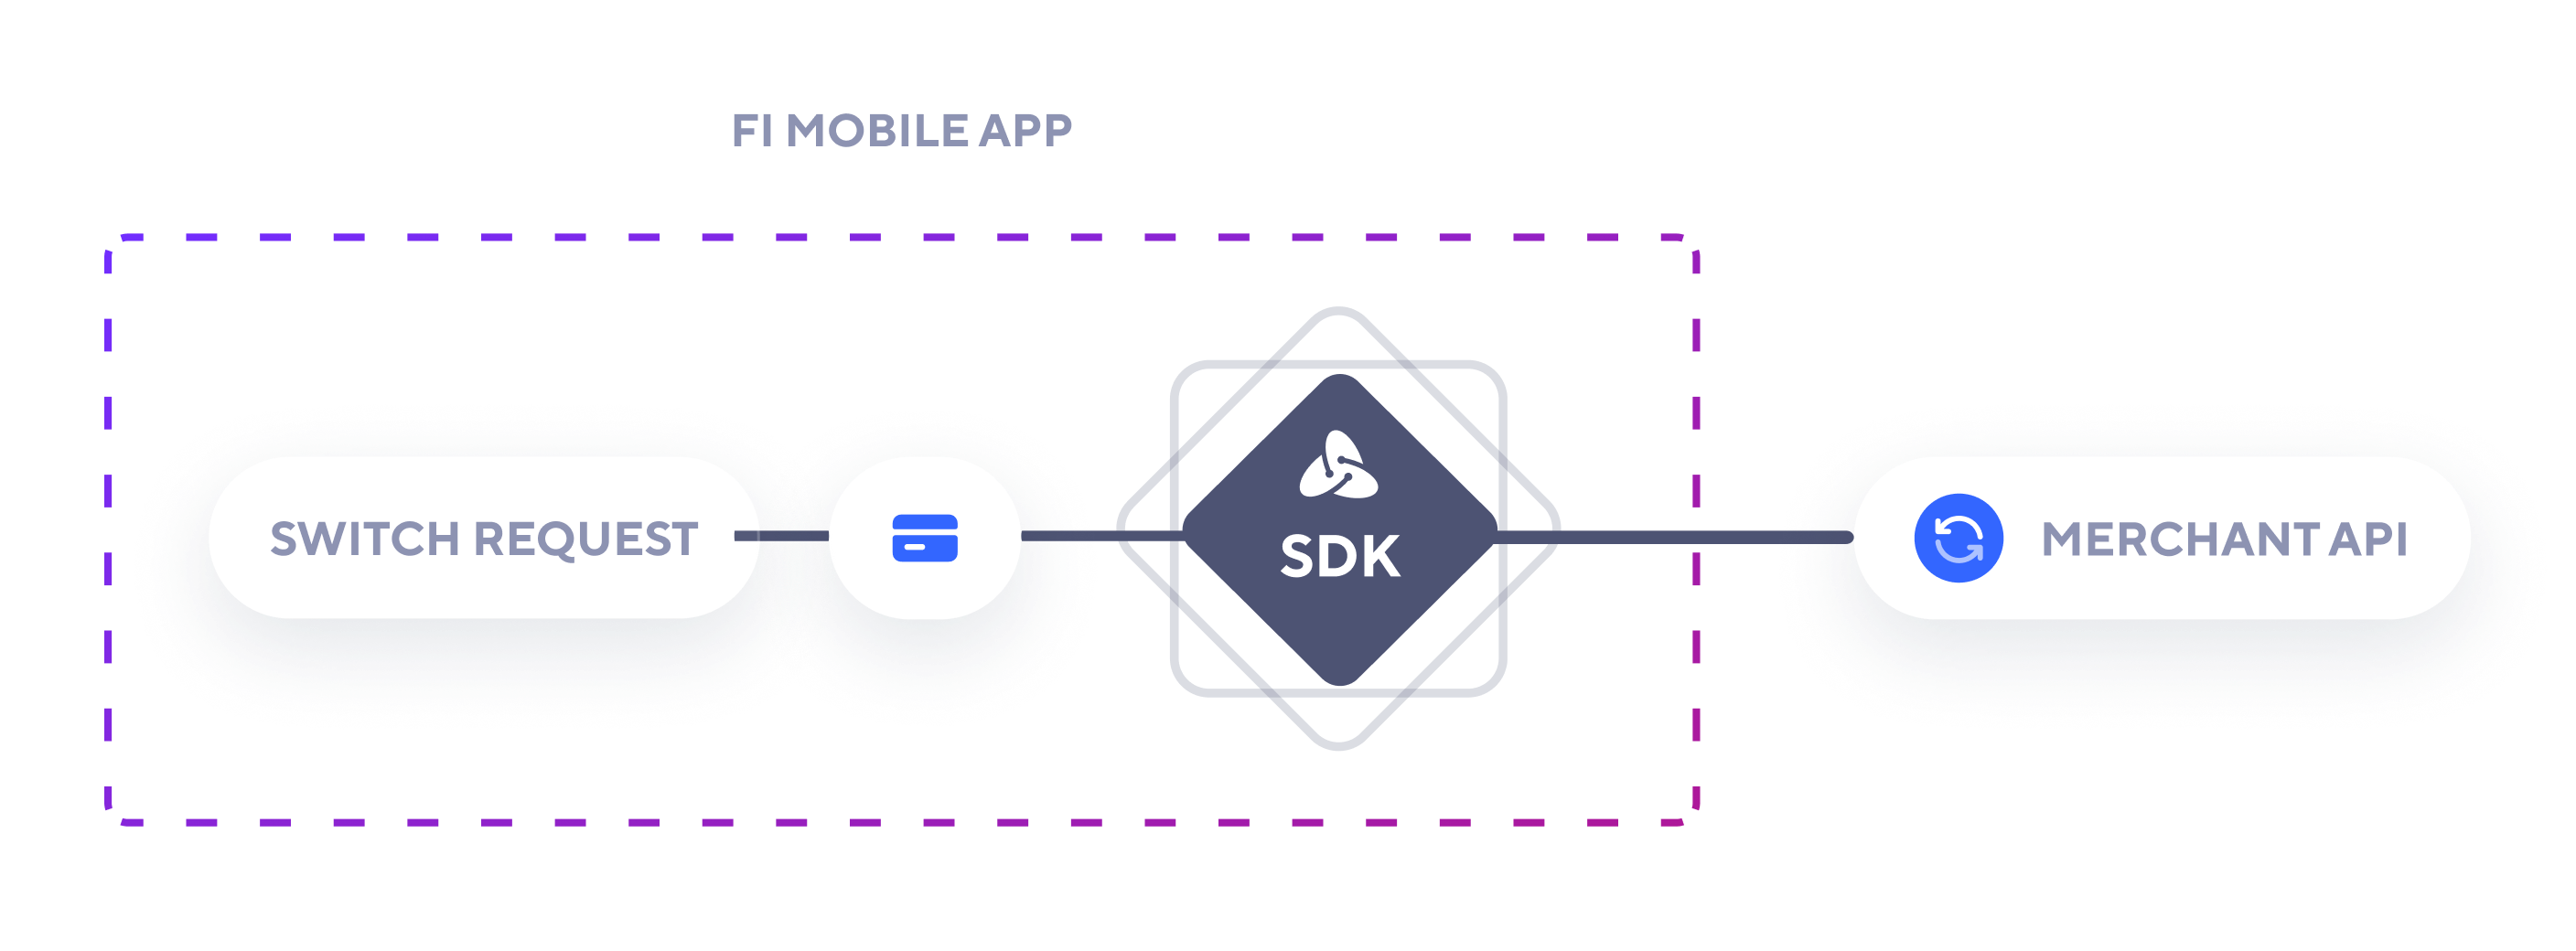
In this flow, you create an access token with just your identifier. When the user starts a tasks, you will receive a data request event from the SDK, at that point you pass the card data to the SDK. In this situation the PAN and CVV never leave the users device except for being sent to the specific merchant.
Example request:
POST/access-tokenTry it in the Emulator
On the Emulator page on the Atomic Console you can interactively configure and launch an instance of Transact. This is an embedded instance of our SDK within the Console. Use it to test variations of the flow, see the outcomes of Tasks using our Test Credentials, and customize Transact itself.
Create your configuration
Transact requires a configuration object when initialized in a live application. To get started you only need the publicToken from the previous step and the tasks you wish to execute. This configuration object has many options to customize the look and behavior of Transact.
{
  "publicToken": "PUBLIC_TOKEN",
  "tasks": [
    {
      "operation": "switch"
    }
  ]
}
Add Transact to your app
Atomic's Transact is a client-side SDK that allows your users to connect their payroll accounts to your app.
Transact will handle credential validation, multi-factor authentication, and error handling for each system that we support. Transact supports browsers, native apps, and hybrid apps.
Testing
To aid in testing various user experiences, you may use any of these pre-determined "test" credentials for authentication. Any password will work as long as the username is found in these lists. If the authentication requires an email, simply append @example.com to the end of the chosen username.
Upon submission of your credentials, a test Task is created in Atomic’s system to process the end user’s data. These credentials can be toggled off for production use in the Atomic Console.
These flows operate identically to the way the Atomic system functions in production. Running a test Task will generate the same events and webhooks as a Task run by an end user.
Successful operation
Test where the user's credentials are correct and the task completes. When answering MFA questions, any answer will be accepted.
| Username | Phone Number | Description |
|---|---|---|
test-good | (555) 555-0100 | Test a successful operation. |
test-code-mfa | (555) 555-0101 | Test an authentication that includes a device code based MFA flow. |
test-push-mfa | (555) 555-0102 | Test an authentication that simulates push-based MFA. |
test-question-mfa | (555) 555-0103 | Test an authentication that simulates question-based MFA. |
Error establishing connection
Test where the user encounters an issue connecting to the third-party system.
| Username | Phone Number | Description |
|---|---|---|
test-system-unavailable | (555) 555-0104 | Test the user experience during a third-party system outage. |
test-unknown-failure | (555) 555-0105 | Test the user experience when there is an unexpected error. |
test-session-timeout | (555) 555-0106 | Test the user experience when the auth session has timed out. |
test-connection-error | (555) 555-0107 | Test the user experience when there is a connection error caused by a network failure. |
test-high-latency | (555) 555-0108 | Test the flow which occurs when there is high latency communicating with backend systems. |
test-post-auth-delay | (555) 555-0109 | Test the flow when there is a post-auth delay happening. This may occur due to an unanticipated change in the third-party system. |
test-failure | (555) 555-0110 | Test a failure that occurs after a successful authentication. |
Payroll system configuration
Test where the user encounters an issue with their payroll system configuration or access.
| Username | Phone Number | Description |
|---|---|---|
test-distribution-not-supported | (555) 555-0111 | Test a user who enters an unsupported deposit amount. |
test-routing-number-not-supported | (555) 555-0112 | Test a user whose payroll system rejects the routing number of the target deposit account. |
test-product-not-supported | (555) 555-0113 | Test a user whose payroll system does not allow the operation. |
User issue
Test where there is an error that occurs due to an action of the user.
| Username | Phone Number | Description |
|---|---|---|
test-bad | (555) 555-0114 | Test an unsuccessful authentication. |
test-lockout | (555) 555-0115 | Test a user who has been locked out of their account. |
test-account-unusable | (555) 555-0116 | Test a user whose payroll account rejects the target deposit account. |
test-enrolled-in-paycard | (555) 555-0117 | Test a user enrolled in a paycard, which prevents payment via direct deposit. |
test-expired | (555) 555-0118 | Test a user whose payroll password has expired. |
test-transaction-pending | (555) 555-0119 | Test a user who already has a direct deposit change in progress. |
test-account-setup-incomplete | (555) 555-0120 | Test a user who has not fully onboarded to their employee payroll system. |
test-work-status-terminated | (555) 555-0121 | Test a user who is not an active employee in the payroll system. |
Receiving Data
As users navigate through the Transact flow, Atomic provides data about their actions and any created Tasks. The Transact SDK generates and emits client-side events during user interactions. Once a Task is created in the flow, you will receive webhooks containing Task-level details, such as the Task ID and Task status, all of these events will contain the identifier initially passed to Atomic when the AccessToken was created.
Transact Events
Transact emits events and passes them to your application as a user interacts with the UI. Such events allow applications to react and perform functions as needed. Some events will be passed with a data object with additional information.
When using the Atomic Console Emulator page all events emitted by the Transact instance are output on the page for you to explore.
For full documentation of Transact events, please refer to the Transact Events Reference .
PayLink APIs
The PayLink APIs enable you to retrieve account data and suggested actions to enhance your user experience. After a connection is established, you can access details such as account balances, due dates, and plan levels.
Alternatively, you can retrieve and present available actions for a company in your UI before a connection is made, if preferred. These actions, provided by Atomic, include options like canceling or pausing a subscription or adjusting a plan, allowing your system to determine the most relevant choices to present to the user.
Please refer to the PayLink API Reference documentation for more information.
Webhooks
As a Task is created and progresses, Atomic will issue webhooks to your configured endpoint(s).
You can configure webhook endpoints via the Atomic Console. Atomic will issue POST requests to the designated endpoint(s). We recommend using Hookbin as a way to inspect the payload of events during development without needing to stand up a server.
To aid building, we surface all webhooks for a Task in Console. Visit the details page of any Task in the Atomic Console and scroll down to the Webhooks Events section to view all of the data associated with that Task.