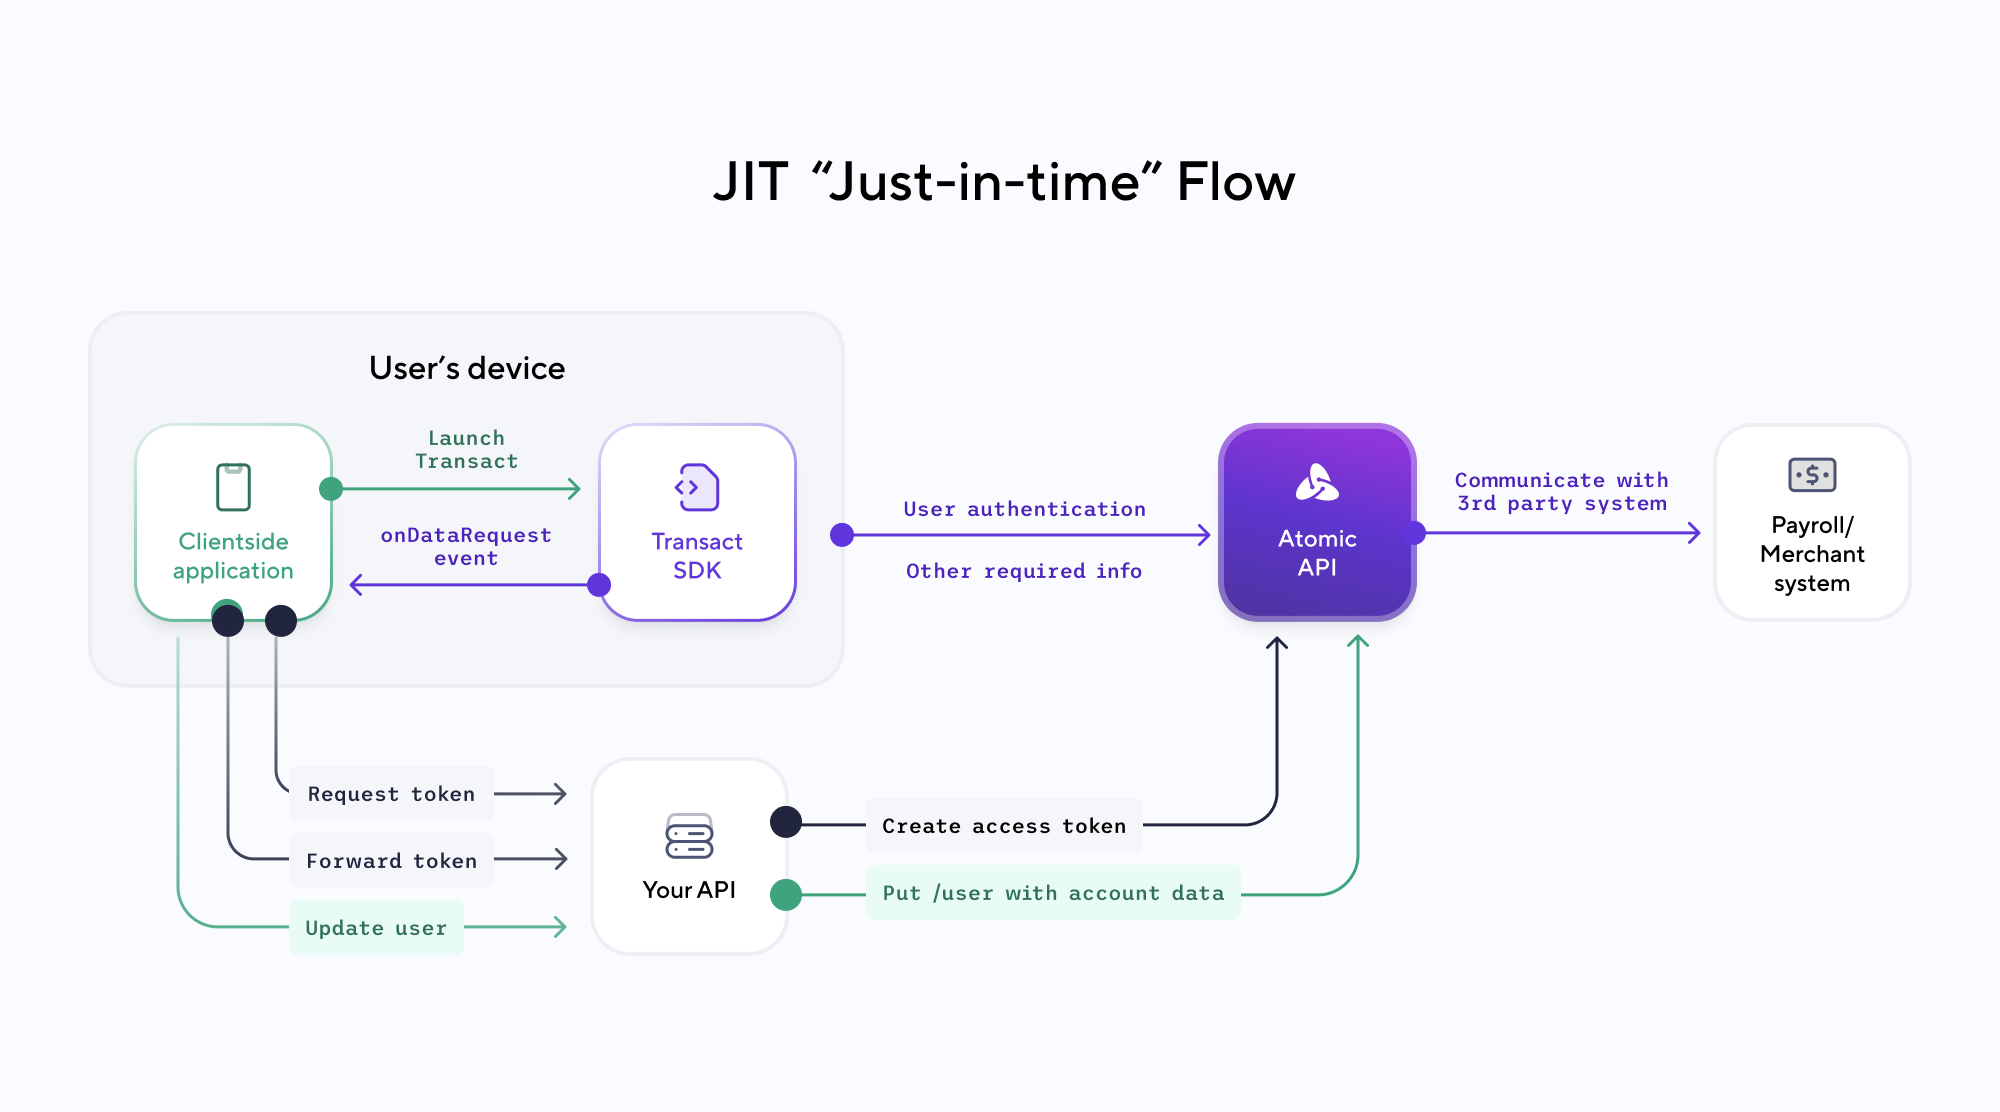
Just-In-Time (JIT) Flow
The Just-in-Time (JIT) flow is a method that ensures sensitive information is transmitted precisely when required. In the context of the Atomic experience, the JIT flow focuses on the secure and timely transfer of user data and account details. This process is initiated immediately after user authentication, ensuring that the data is available just when it is needed for subsequent actions or operations.
Integration Overview
Atomic's integration is built on a few key components:
- Clientside Application:
- Services Layer:
- Transact SDK:
- Atomic API:
- 3rd Party System:
This is the interface where users interact directly with Atomic's services. Our application will be embedded within your experience and launched via a call-to-action presented to the user in an appropriate location.
Once the user has interacted with the call-to-action, your API will initiate the flow and transmit relevant data and user information to Atomic's API. This step involves creating an access token and pass Atomic the data when required.
This is the clientside component provided by Atomic; to be embedded into your application. It manages user interactions and facilitates the transmission of user decisions, such as payroll provider selection and deposit allocation for our UserLink Deposit product.
The backend service layer for Atomic. Manages interactions with payroll providers, merchant systems, etc., ensuring that user data can be securely transmitted to Atomic and then relayed to the relevant systems.
Atomic supports third-party services that handle specific actions on behalf of our end users. These include payroll systems for the UserLink products and merchants, wallets, and billing systems for PayLink.
Step-by-Step JIT Flow
Step 1: User Initiates Atomic Experience
The user initiates the process by clicking a designated action button (e.g., "Switch Direct Deposit") within your application. This triggers a request from your clientside application to your API for an access token.
Step 2: Create an Access Token
Your API sends a request to Atomic's API, which includes a unique user identifier for communication across systems.
Use a POST request to the /access-token endpoint. For request body fields and examples, see Create Access Token.
At this stage, pass limited, display-safe account data so the UI can show which accounts the user can select from. We recommend sending account last four digits and relevant account titles/names now, then sending sensitive fields after authentication via the JIT flow.
Step 3: Forward Public Token
Upon receiving a public token from Atomic’s API, your system forwards this token to the clientside application. This token is required for launching the Transact SDK and ensuring secure connections.
Step 4: Launch Transact
The public token is used to initialize the Transact SDK, preparing it to handle user interactions. You can launch the SDK with configurations to customize the UI. Additionally, you can register callback handlers for events such as onFinish, onClose, and onDataRequest. For more details on SDK parameters and callbacks, please refer to the Transact SDK parameters and Transact SDK event listeners documentation.
Step 5: User Actions in Transact SDK
Within the Transact SDK, users select the systems they would like to take action in, authenticate into the system, and decide on the action they wish Atomic to perform. After confirmation, Atomic is authorized to execute the Task as specified when Transact was initialized.
User data omitted from the initial API call to create an access token, such as account details, will be needed after authentication but before an associated action can be taken.
Step 6: Consume Clientside Event
Within the Transact SDK, the onDataRequest event is triggered when additional data is required to complete a Task. Transmit remaining data by handling this clientside event and send the relevant data from your backend system.
What to do:
- Listen for the
onDataRequestevent in your clientside implementation of the Transact SDK. More details can be found on the onDataRequest event page. - Handle the event by instructing your backend to send the requested account details via an API call to Atomic.
Step 7: Send Account Details
In response to the onDataRequest event, use the Update User API endpoint to transmit the missing account data. This API allows you to securely update a user's details in the Atomic system so that the Task may proceed.
Key Details:
- Use a PUT request to the
/userendpoint. - Each request body should include exactly one account object under
data.account. - Authentication is handled via the API Key and Secret method.
More details on this endpoint can be found on the Update User page.
Step 8: Atomic Sends to 3rd Party System
Atomic will update the account details in the payroll system or payment method in the wallet or merchant system. The user receives status updates directly within the UI, detailing whether the update was successful or if further action is needed.
Optional Integration Layers
- Webhooks: These provide real-time notifications about Task statuses, helping you manage user experiences even in cases of network interruptions or app closures.
- API Data Requests: For those preferring to pull data, Atomic’s API allows direct access to detailed webhook information.